Wednesday, September 15, 2010

The Making of Madelyn's Quilt


My sister asked if I would make a blanket for Madelyn's "big girl" bed, so a couple of months ago, I began the process of making this quilt for my niece. This was my first attempt at a big quilting project. I've made several  quilted craft items, and a few patchwork bags, blankets, and tablecloths, but nothing this big.

When I was visiting my family in July, my sister and I went fabric shopping in hopes of finding the perfect fabrics for Madelyn's quilt. Kelly wanted colors to match Madelyn's room which were mostly pink, green, and a little red.


Dolly Dresses 
Fabric line by Holly Holderman for LakeHouse Dry Goods

After going to several fabric and quilt stores and not finding what we wanted, we decided to try our luck online. I came across several different fabrics before Kelly and I decided on the fabric line, Dolly Dresses by Holly Holderman for LakeHouse Dry Goods. I had used LakeHouse fabrics for other projects and absolutely loved the prints and quality. Kelly was drawn to the line because of the pink bunny fabric, bunnies are a favorite of Madelyn and it was perfect to be able to include them into her quilt.

I was like a kid in a candy store picking out which fabrics to order! I used 3 different online quilt stores to get the Dolly Dresses fabrics that I wanted. My favorite quilt shop was The Quilted B. They were wonderful to deal with and even sent me a quilted pin cushion with my order!! Got to love the freebies!

I decided I would make a Rail Fence quilt which is a perfect pattern for beginners like myself. I asked a quilter friend of mine for advice on quilt making and after meeting with her one afternoon, I walked away with many great techniques to help my quilting project go smoothly. I learned so much in the two hours that I spent with her, and knew my project would be a success thanks to her invaluable help.

The first step in my quilt making was cutting the fabrics in to 4inch strips. After the strips were cut I sewed three different fabrics strips together, side by side, making one big strip. Then I used a 10 1/2 inch square ruler to cut the strips into squares.  Once all the squares were cut, it was time to figure out my pattern. I used the living room floor to lay out the 63 squares and played with arranging them until I was happy with the design.

After I figured out the pattern of the squares,I numbered each square with a sticky note so it would save me any confusion while sewing them together.  I sewed squares together, one row at a time, and then sewing the rows together as a new one was completed. Below is the finished top of the quilt.


The next step was pin basting. First I taped the bottom piece of the quilt to the floor, making it taut without wrinkles. Then I placed the cotton batting on top of that, followed by the quilt squares. After the 3 pieces were in place I started pinning. I used about 400 large safety pins to hold the pieces together. The pin basting is what keeps the three pieces of fabric held together, without bunching up while sewing.


When all the pins were in place I started the machine quilting and I chose to "stitch in the ditch."  I thought this would be the easiest technique for me since I would be using my sewing machine which isn't a special quilting machine. The fabric was a little bulky to fit under the sewing machine arm, but I managed it fine, and it was easier than I expected it to be. 


After the three pieces were quilted together, I made the bias. My friend gave me a great print out on how to make and sew quilting bias so this went very smoothly. The tedious part for me was the hand-sewing. The bias is machine sewed on to the front of the quilt but hand-sewed on to the back. It took a good 12 hours to complete the hand sewing. This was hard for me because I'm not a TV watcher, and find it difficult to sit down for long periods of time without being able to multitask. I think if I could have packed the quilt into my suitcase, and worked on it during all of my airport appreciation time, it would have gone faster but unfortunately it was too big to fit into my suitcase. I did, however, take it to a couple of  the boys' piano lessons, and managed to watch a movie or two while stitching. 


And here's the finished quilt!! I also made a matching pillow sham. I didn't have a pattern and had very limited fabric leftover so I did what I could to make it cute.

This is the front of the sham......


And the back.


And here's the "big girl" sitting on her big bed with the new quilt!

Yay! It's done! I enjoyed every part of making it and think I might have caught the quilting bug!!

Monday, September 6, 2010

Reusable Lunch and Snack Bags


A couple of months ago I flew with someone who was using reusable sandwich bags in her lunch. I loved the idea and wanted to make some for myself and the boys. After googling the topic I found several posts and tutorials which invoked the question, "What fabrics are food safe?"

After reading way too many articles and blog posts with varying opinions on food safe fabrics, I decided to try using ripstop nylon for my lining and cotton for the outer layer. What I've read is that ripstop is especially safe if it's not coated, and if it is coated then be sure to put the coated side away from the food. I found this to work well and it was easily accessible at my local fabric store. The kids tested these for a couple of weeks and all of their food stayed fresh with the exception of the Pirate Booty which seemed to get stale after a few hours.

More recently I found another supposedly "food grade" fabric called ProCare which does not contain DEHP, Phlalates, or BPA plasticizers. I found a couple online sources for ProCare and decided to order mine from here. However it did take a good 2 weeks to arrive. The ProCare is definitely more waterproof than the ripstop, and I found it easy to sew as well. Until I find something better, ProCare and/or ripstop nylon will be my liner of choice for making reusable bags.

There are many choices out there. Some people even suggested sewing a Ziploc bag or cereal bag as a liner. Others suggested only using polyurethane coated nylon which I have yet to find a supplier for. The bottom line is to use what you are comfortable with and what works best for your family. Do the research and decide for yourself. I am not an expert but after all the reading about and testing of fabrics, I decided I was comfortable with the two fabrics I used.

 In addition to finding many opinions on fabric choices, there were also several different ideas on how to sew the bags. I decided to go with this pattern. I really like the simplicity of it and also that there isn't any inside seams that food can get stuck in. I cut the fabric for the sandwich bags 7 1/2  x 15 inches and the snack bags 7 1/2 x  11 inches. I also chose to use Velcro on the tops because it keeps everything nicely tucked inside.

The bags are easy to clean. At the end of the day, I simply turn the bags inside out and rinse or if needed scrub with my kitchen soap/brush and set out to dry, and then at the end of the week I throw them in the wash.

I love these bags and so do the kids. They got to choose their fabric from my big bin of leftover fabrics so it was a win-win for all of us. The best thing is not having to buy and throw as many plastic baggies as we have in the past!

One Hot Summer!

The boys and I spent a week in Arizona visiting family this summer. Arizona is not the place to be in mid July, unless the ones you love and miss live there! Most of the week was a scorcher with temperatures reaching as high as 119 degrees! Yes, it's a "dry" heat but 119 degrees is hot no matter how dry the air is!!

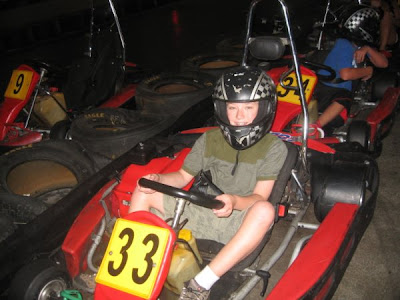
Thankfully my sister has a pool and the kids were able to swim every day. Grandma also made sure that boys had plenty to do. She treated the boys to indoor go kart racing. This was their first time to drive go karts, something Ethan has been asking to do for the past couple of months.
Ethan lucked out because the minimum age was 10 and he barely reached the gas and brake pedals but it didn't stop him from zooming around the track!

Mac showed off his racing skills as this was his second time that week to go kart. Grandma took him a few days earlier while Ethan was in San Diego. 
 Inside the lobby was an Indy car and a NASCAR. The boys chose to have their picture taken next to the Indy car.

Grandma also treated all of us to Wet n' Wild water park tickets. My sister, Kristin and I took the kids and we decided that since it was so hot, the best time to go would be at night! It worked out perfect because we went after dinner when the sun was setting, and in addition to no waiting in lines under the hot sun, we also found great parking!
Floating down the lazy river!
Grandma and Grandpa V. also took the boys and their cousins, Jonah and Joshua, swimming at a Scottsdale resort while I got to spend some time with my friend, Eileen. 
There's no better way to cool off in the Arizona heat then spending the day in the pool!

Also as a yearly (Arizona visit) tradition my sisters and I have the kids' pictures taken together. And this year Grandma and Grandpa joined in the picture fun!
Thanks everyone for a fun visit!! We hope to see you again in the fall when the temps are little more bearable!!

Sunday, September 5, 2010

Ethan's Trip with the Grandparents

Keith parents have 17 grandchildren and each year they take at least one kid on a special trip. This summer it was Ethan's turn. They chose to spend the week with Ethan in San Diego. Ethan was born in Laguna Hills, California and he's been wanting to go there for sometime now, so this was the perfect opportunity for him to revisit the place he was born.

The grandparents spoiled Ethan during the week that he was with them. The stayed at a resort that had 17 tennis courts! Ethan brought his racket and also convinced Grandma to bring hers so they could enjoy playing some games together. Ethan also participated in a tennis clinic while he was there.

He also spent many hours in the pool and made a few friends along the way. He had a great time with his grandparents but said that the best part of his trip was the day they spent at San Diego Wild Animal Park.
He took several pictures and here are some of his favorites. Above is a meercat.
He got to feed the parrots.

And pet the gazelles too.

Some other highlights were getting to eat lots of junk food, having a king-sized bed all to himself, watching movies, and spending quality time with his grandparents. A trip he'll always remember! Thanks Grandma and Grandpa!!